How To Secure Your Iphone
If one object you own encapsulates who you are, how you think, and what you do, it's your smartphone. Our phones not only contain our contacts and messages, but capture and store countless other metrics about our lives, from financial records to health data to myriad communications with everyone we know.
Smartphones also contain data about the places we go (and the routes we took to get there) as well as the searches we make and websites we browse (revealing what's on our minds). Thanks to journaling and to-do apps, they even document our goals, hopes, and dreams. And smartphones aren't just data-retention devices; the apps and services we use on them broadcast data about us to third parties.
That's why it's so important to understand what privacy and security protections the smartphone you use offers—and to make sure you have such protections enabled. I've written before that Apple is unique among modern tech giants in that it builds its products with privacy at the forefront. But many of those protections and tools available on every iPhone only make a difference if you're aware of them—and judging from my conversations with friends, many people aren't.
If you're an iPhone user, these are the security and privacy features you need to know about—and should be using.
Security code autofill
What it is: Many sites and apps—from Facebook and Google to financial services—offer two-factor authentication, or 2FA. With 2FA enabled, logging into a website or app requires both your password and a unique code that is texted to your phone number or delivered via an app such as Google Authenticator. You have to input this code in order to gain access to your account. Even if someone else has your password, they won't be able to break into your accounts if they can't get the code.
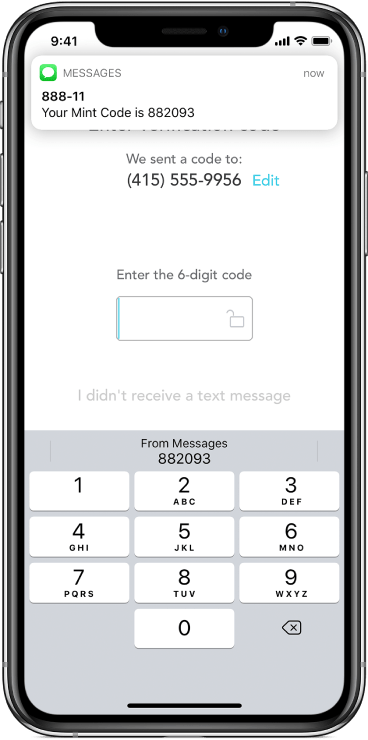
The problem is many people choose not to enable 2FA, which has traditionally been a pain involving hopping back and forth and copying and pasting. So Apple introduced a feature in iOS 12 and higher called security code autofill. Now when you log into an app or website where you have 2FA enabled, you no longer need to navigate to the Messages app to retrieve your texted 2FA code. As soon as the text with the code arrives, it'll be routed to the iPhone's keyboard where you can just tap on the code to autofill it into the security field in an app or website.
Why it's important: Apple eliminated the most annoying thing about 2FA, which means more people are now likely to adopt it. If an app or website offers 2FA, you should enable it immediately. Thanks to iOS's security code autofill, 2FA will no longer slow you down.
How to enable it: Security code autofill is built into iOS 12 and higher, so you don't need to enable the feature on your iPhone. When you get a text with a 2FA security code, it'll be automatically routed to the code field on the app or website you are trying to log into.
You will, however, need to enable 2FA on any apps or websites you want to use the security feature with. I highly recommend enabling 2FA on every social media and financial site you use. You can see if some of the sites you use offer 2FA here.
Password reuse auditing
What it is: iOS has long had the Keychain, an encrypted password manager that saves your usernames and passwords so they can be auto-filled on apps and websites you log in to. But with iOS 12 and higher, your Keychain now has a password reuse auditing tool built in. What this does is identify every instance where you've reused a password for multiple sites and apps.
Why it's important: Password reuse is a major security problem. Before iOS 12, if you used the same four or five password variations out of laziness across hundreds of sites and apps, you weren't alone. Two recent surveys found that 59% of people use the same password everywhere, and 83% of people reuse the same password on multiple sites. If just one of those sites or apps gets hacked, your information anywhere else you used that password is at risk.
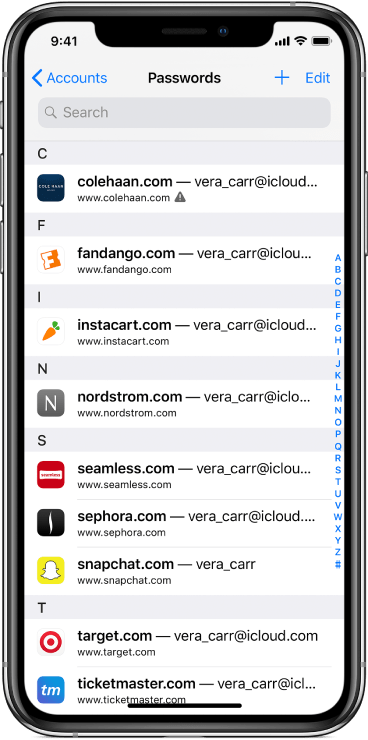
But now thanks to password reuse auditing in iOS, you have no excuse to be lazy anymore. You can see which websites you've reused passwords on and then give them unique passwords. However, that's not the biggest advantage of this tool. The real advantage is that it visualizes how vulnerable you've made yourself by reusing the same password on multiple sites—and as we'll see in a moment, you can easily create unique strong passwords for every site and app you use.
How to enable it: iOS's password reuse auditing tool is a built-in feature in iOS 12 and higher. To see it in action, and to see which sites and apps you've reused passwords on, go to the Settings app on your iPhone, scroll down, and tap "Passwords & Accounts," and then tap "Website & App Passwords." This is where your Keychain is located. You'll need to authenticate with Face or Touch ID, and then you'll be taken to a list of your app and site passwords.
Any site or app that has an exclamation mark in a triangle next to it means you are also using its password for another site or app. If you see this symbol, tap on it. On the next screen, you'll see a link that says "Change Password on Website." This will take you to that site's password management screen where you can change your password.
If you have dozens or hundreds of services that use the same password, creating unique passwords may seem daunting—BUT do it anyway. If you have a couple hundred accounts with passwords, just change 25 passwords a day for eight days, and then every account you use will have a unique password in little more than a week.
Automatically create strong web and app passwords
What it is: iOS 12 and higher also has a feature that will automatically create complex and unique passwords for websites and apps. These are passwords that are so complex it is doubtful anyone could ever guess them—even you.
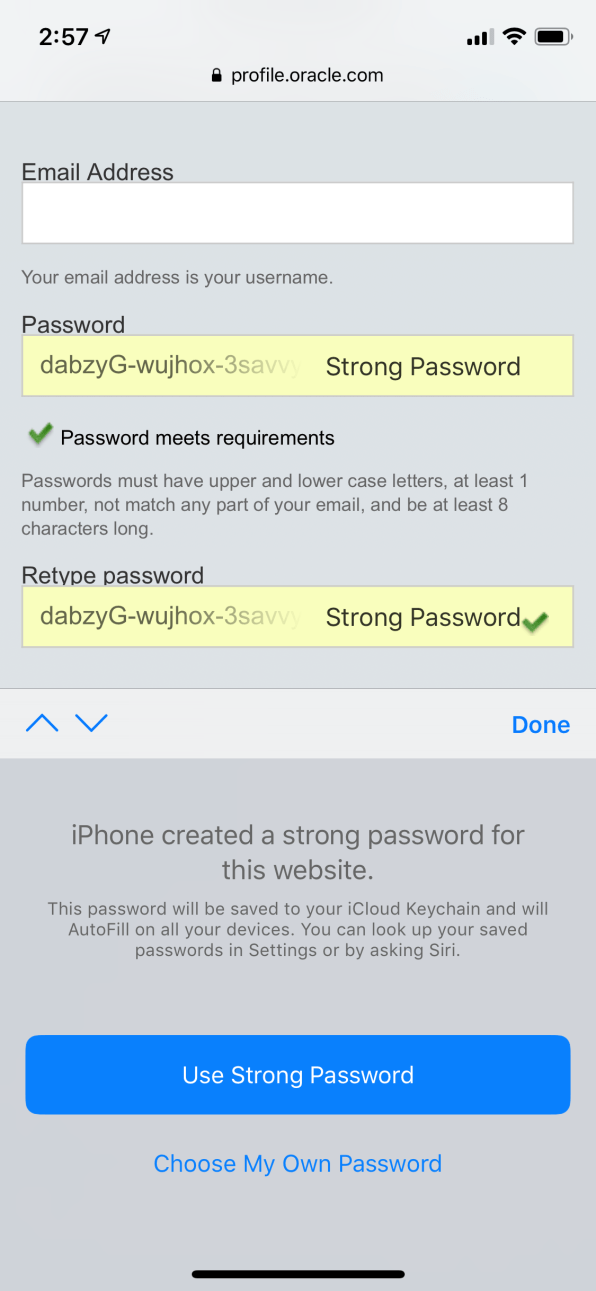
But you don't even need to write these passwords down. iOS will automatically save them to your Keychain, and they will be synced across all your iOS devices and Macs, where they'll automatically be filled in when you log into a site or app.
Why it's important: As we've seen, even if you already have a pretty strong password, it becomes much weaker if you use it at multiple sites. But most of us don't even have strong passwords. Generally, people choose weak passwords because they are easier to remember. But password managers, like the one built into iOS and MacOS, have made remembering passwords obsolete. Still, the problem remains that many people simply don't create strong, random, and unique passwords. So now iOS will do it for you.
How to enable it: Next time you create an account in an app or at a website on your iPhone, when you select the "Create password" field, you'll now see iOS has automatically inserted a unique password in the field. Tap the "Use Strong Password" button to use the recommended password, and iOS will automatically store it in your Keychain. iOS never generates the same strong password twice.
Set encrypted messages to auto-delete
What it is: iOS automatically uses end-to-end encryption on all messages sent using Apple's Messages app. This means no one can read your messages except for you, and the recipient, not even Apple—even if the company is ordered to by a government agency. Yet end-to-end encryption won't stop someone who has access to your phone from accessing your messages, which is why you should set them to auto-delete sooner rather than later. Once an encrypted message is deleted from your device, it is virtually impossible to recover (though a copy will remain on recipients' devices until they delete it, too).
Why it's important: By default, iOS will store all your iMessages on your phone forever—and they will be transferred to your new phone when you get one. But these messages often contain very personal communications with our loved ones or details that could make us or them vulnerable. For example, parents will often communicate with their children about their schedules and whereabouts, such as what time they will be at soccer practice. A third party who gains access to years worth of those messages could reasonably work out where your child is going to be and when. Other times, we'll share sensitive information with our family or friends via text messages—like the code to our home security system if a friend is watching our place while we are away. This information would be invaluable to a stalker or thief, and there's no reason a copy of it should be sitting around on your phone for years.
Beyond issues of privacy, years' worth of text messages can take up an insane amount of space on your smartphone. Back when I had my text messages set to save forever, I looked at how much space they were taking up on my 64GB iPhone: 8.5GB! And I never go back and look at text messages that are more than a week old.
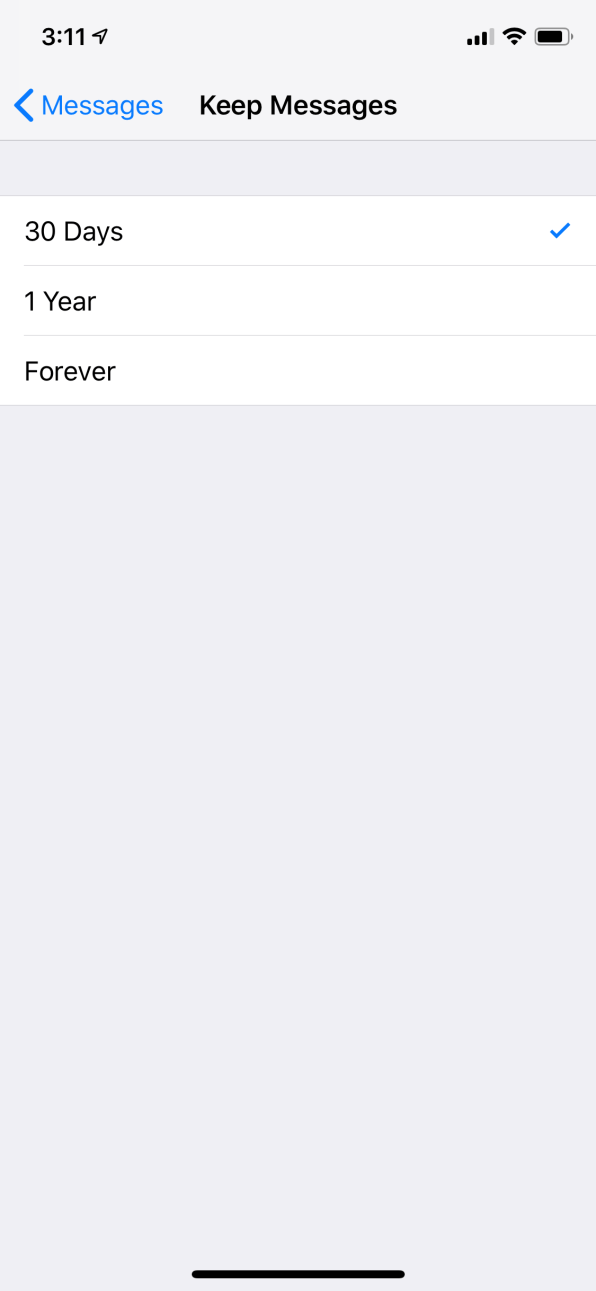
How to enable it: On your iPhone go to Settings>Messages>Keep Messages. On the next screen, you'll be able to select to keep messages for 30 days, one year, or forever. By default, this is set to forever, but I recommend everyone set it to 30 days, or at the most, one year.
Use Safari

What it is: iOS's built-in web browser.
Why it's important: Apple has given Safari built-in privacy features that other web browsers like Google's Chrome would never dream of offering. The most recent version of Safari stops advertisers from tracking you around the web, stops Facebook and Google from tracking your browsing history via like and share buttons, and stops websites from identifying you by "fingerprinting," a technique that uses your device's unique digital signature to identify it online. Safari also lets you manage if websites can gain access to your camera and microphone.
How to enable it: Safari is iOS's default browser, so in order to take advantage of its privacy features, you just need to use it to traverse the web.
Audit and block apps that have access to your camera, microphone, location, and more
What it is: iOS offers you an easy way to see what apps you have given permission to access your camera, microphone, contacts, location, reminders, photos, health data, and more. You can also easily revoke an app's access with the tap of a button.
Why it's important: If you've decided you've given an app too much access to your info or hardware, you can easily revoke that app's access at the system level, cutting it off from harvesting any more of your data.
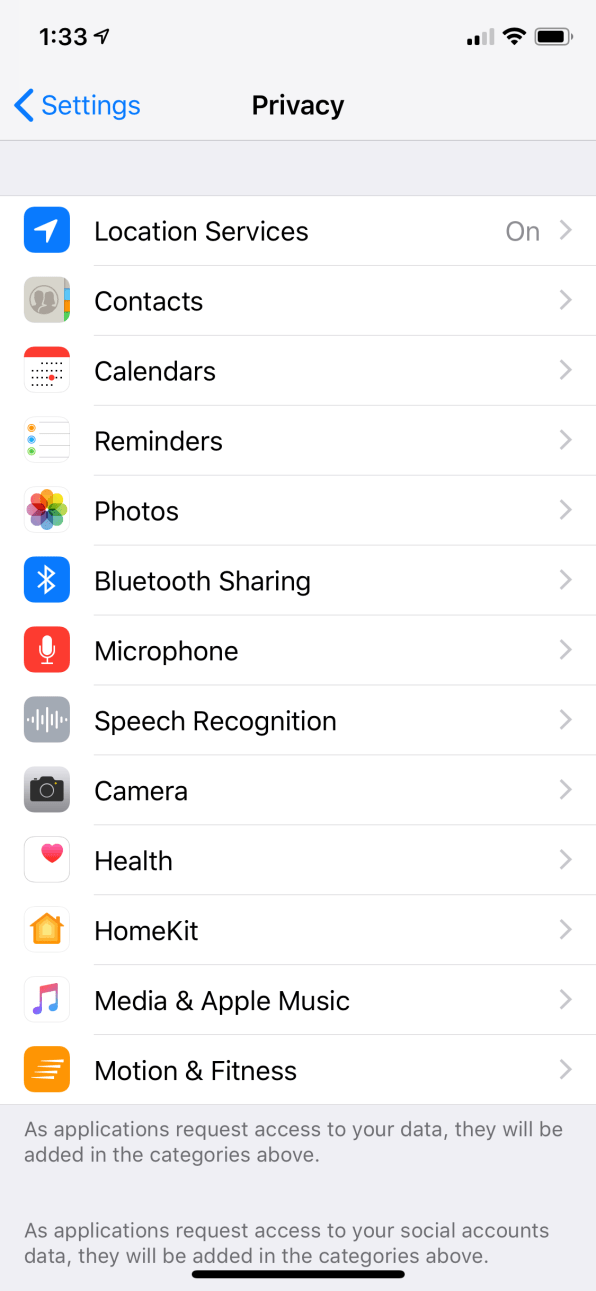
When considering if an app should continue to have access to certain types of your data or hardware, ask yourself if you use features in that app that requires such access? For example, if you never check yourself into places in Facebook, why should the Facebook app continue to have access to your location data (which it is then free to use in other ways, such as for tracking your movements)?
How to enable it: Go to Settings>Privacy and you'll see a list of various types of data your iPhone holds, from location data to photos. You'll also see items like camera and microphone in the list.
Tapping on any one of these items takes you to a list of apps that have requested access to that type of data, such as health data, or your iPhone's hardware, like its microphone. To restrict an app from accessing that data anymore, simply toggle its switch to off. Now the app will be completely blocked from accessing that data or hardware. The only way it can regain access again is if you toggle its switch back on.
Block nosey apps from accessing Bluetooth
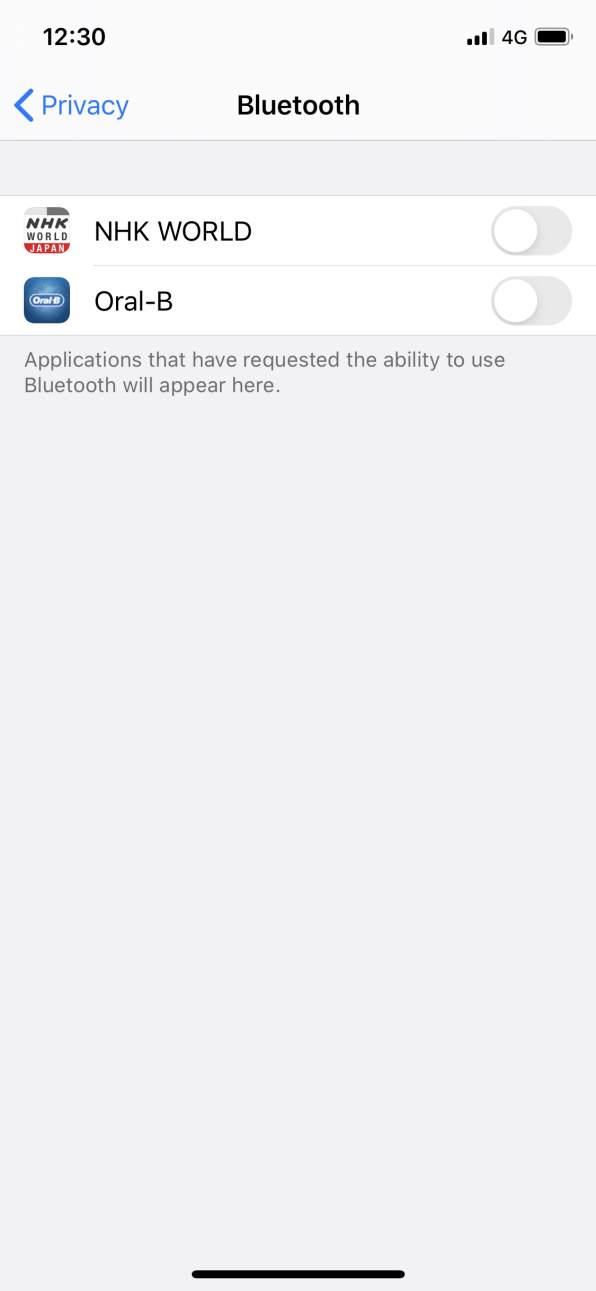
What it is: iOS 13 lets you block apps that have no legitimate reason to use it from accessing your Bluetooth connection.
Why it's important: Bluetooth is a tremendous technology that allows us to wirelessly connect accessories to our iPhone, including anything from AirPods to game controllers. However, over the years, sneaky apps have found that by getting access to your phone's Bluetooth connection, they can track your location in physical space. This is because the apps snag location data from what are known as beacons: small devices that can tell when you are nearby based on the Bluetooth signal your phone emits.
Beacons allow establishments to send location-based alerts to your phone, be they alerts for sales inside specific sections of department stores, or alerts guiding you around a museum exhibit. But apps have also been using these Bluetooth beacon location data to track you without your knowledge.
That's why in iOS 13, Apple created a new privacy setting showing you just what apps are using your Bluetooth data and giving you the ability to shut off those apps' access to your Bluetooth connection. For example, does that journaling app you see there actually need to access a Bluetooth device? If not, why should you allow it access your Bluetooth data?
How to enable it: Go to Settings>Privacy>Bluetooth. You'll see a list of all your apps that have access to your Bluetooth data. Toggle the switch next to an app to off (white) to deny it access to your Bluetooth data.
Search more privately by changing your engine
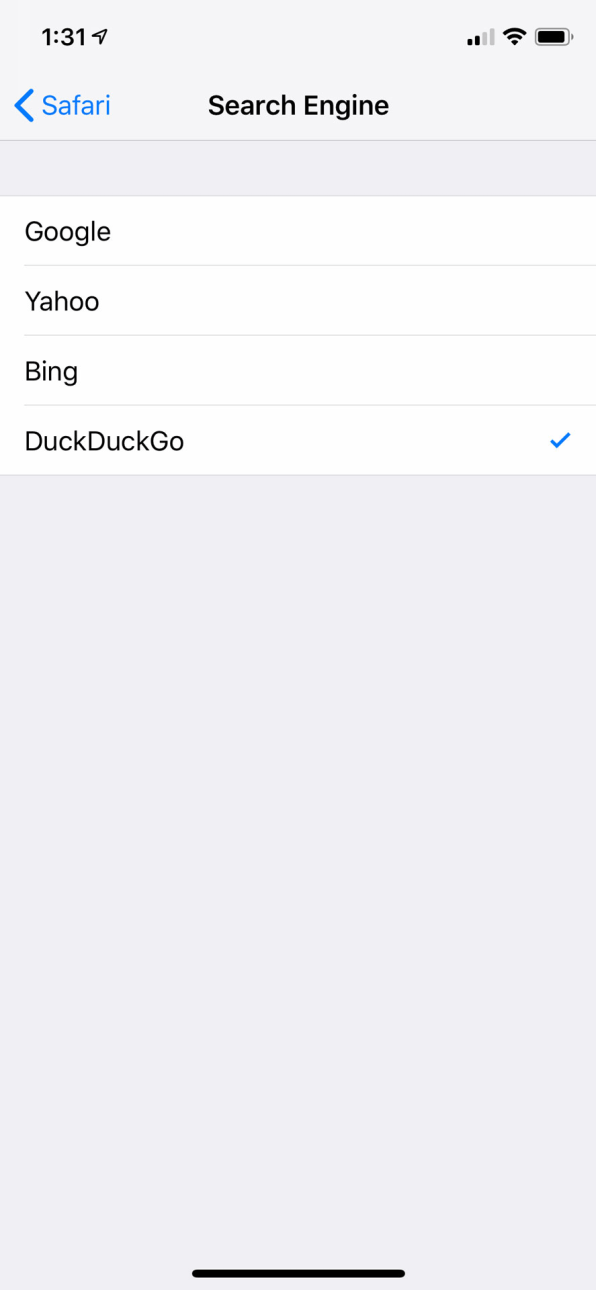
What it is: By default, Safari uses Google's search engine to return results when you do a web search. Google pays Apple billions every year to be the default search engine. But Apple also allows you to choose a different search engine, including offering the privacy-focused DuckDuckGo.
Why it's important: Using Google for search just gives the company more information about you and allows it to better track your movements around the web. In the past few years, Microsoft's Bing, Yahoo, and even underdog DuckDuckGo have improved their search algorithms; all three now serve results that are virtually indistinguishable from Google's. I recommend DuckDuckGo, since its business model doesn't rely on collecting data about you.
How to enable it: Go to Settings>Safari>Search Engine and tap DuckDuckGo.
Silence spam callers
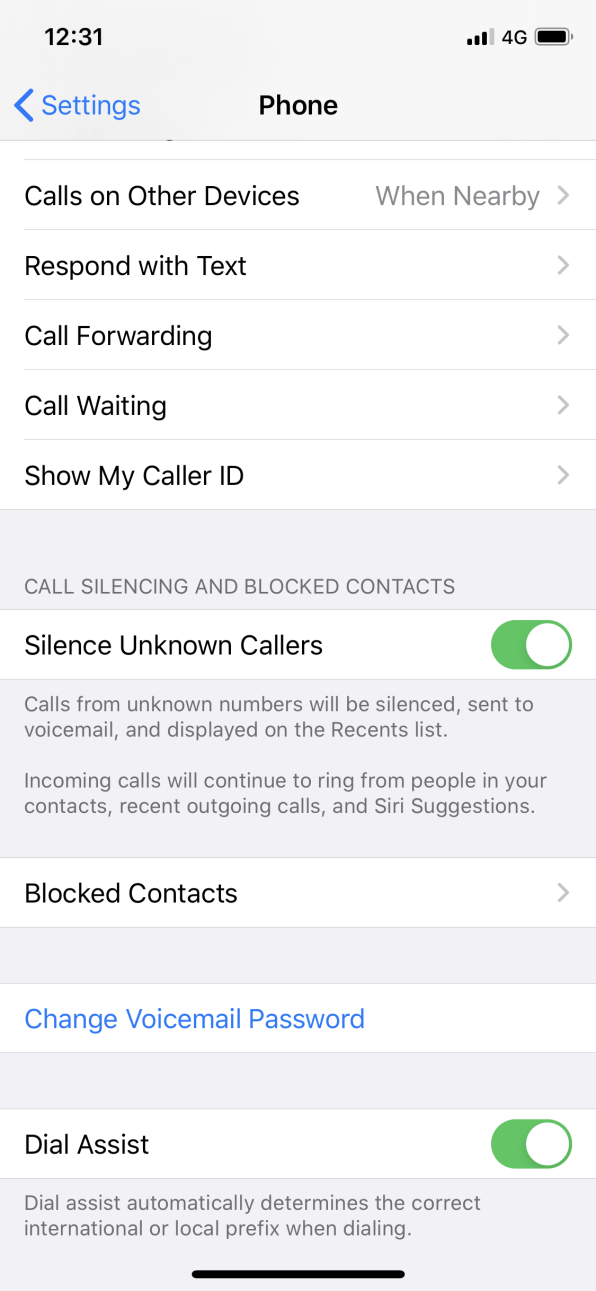
What it is: iOS now offers a feature that is charitably named "Silence Unknown Callers." What it really does is stop robocallers and spam callers from annoying you.
Why it's important: Spam and robocalls are a major problem in America. They lead to wasted time, productivity, and in some cases, higher phone bills. The problem is so pervasive, that YouMail's Robocall Index says 4.7 billion robocalls were placed in January 2020 alone. That's 153 million each day.
While carriers, states, and the federal government have taken steps to diminish the robocall scourge, Apple isn't waiting around for things to get better through legislative initiatives. In iOS 13, the company introduced the "Silence Unknown Callers" feature that, when activated, will automatically send unidentifiable calls to your voicemail (which, let's be honest, no one uses anymore anyway).
How to enable it: Go to Settings>Phone and scroll down until you see the "Silence Unknown Callers" toggle. Tap this switch so it's on (green), and from then on, all calls from unknown numbers (ie: those not in your Contacts) will be silenced for good.
Quickly disable Touch ID and Face ID
What it is: Depending on which iPhone you own, you use either Touch ID or Face ID to unlock your phone without needing to enter a passcode. They're handy but don't offer the same amount of constitutional protections that passcodes offer. That's why iOS now allows users to disable Touch ID and Face ID at a moment's notice.
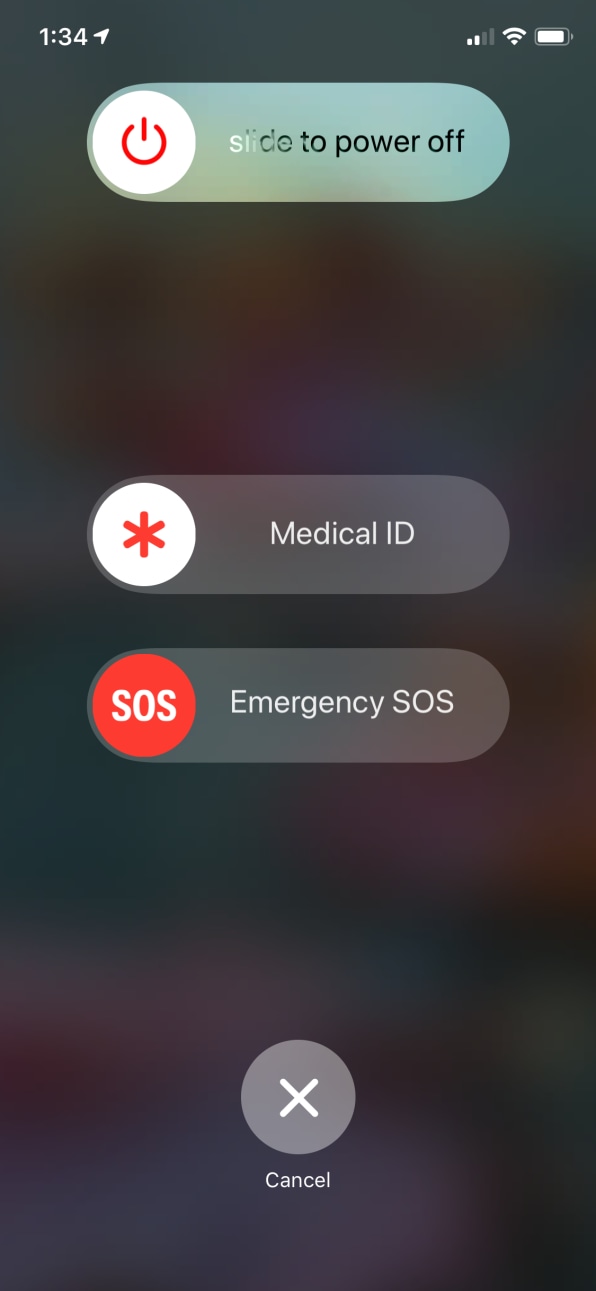
Why it's important: Thanks to Fifth Amendment protections, in most instances, law enforcement can't compel someone to enter a passcode to unlock a device without a search warrant. But prior to 2019, some courts had said that biometric authentication methods aren't similarly protected. In many states, that meant law enforcement could force you to unlock your phone using Face ID or Touch ID. However, that all changed in January 2019 when a judge ruled that law enforcement forcing someone to biometrically unlock their phone "runs afoul" of the Fourth and Fifth Amendments. But law enforcement aside, while Touch ID and Face ID are convenient, both leave you vulnerable to unwanted unlocks when you are sleeping.
How to enable it: Go to Settings>Emergency SOS and make sure the "Call with Side Button" toggle is on (green). Now, whenever you want to quickly disable Face ID or Touch ID, press the iPhone's Side button five times. A screen will appear that shows three sliders: power off, Medical ID, and Emergency SOS. Below them will be a cancel button. Once this screen appears, Face ID and Touch ID are automatically disabled, and you'll only be able to unlock your phone with your passcode (keep in mind, once you unlock it with a passcode, Face ID and Touch ID are reenabled).
In a worst case scenario, nuke your data
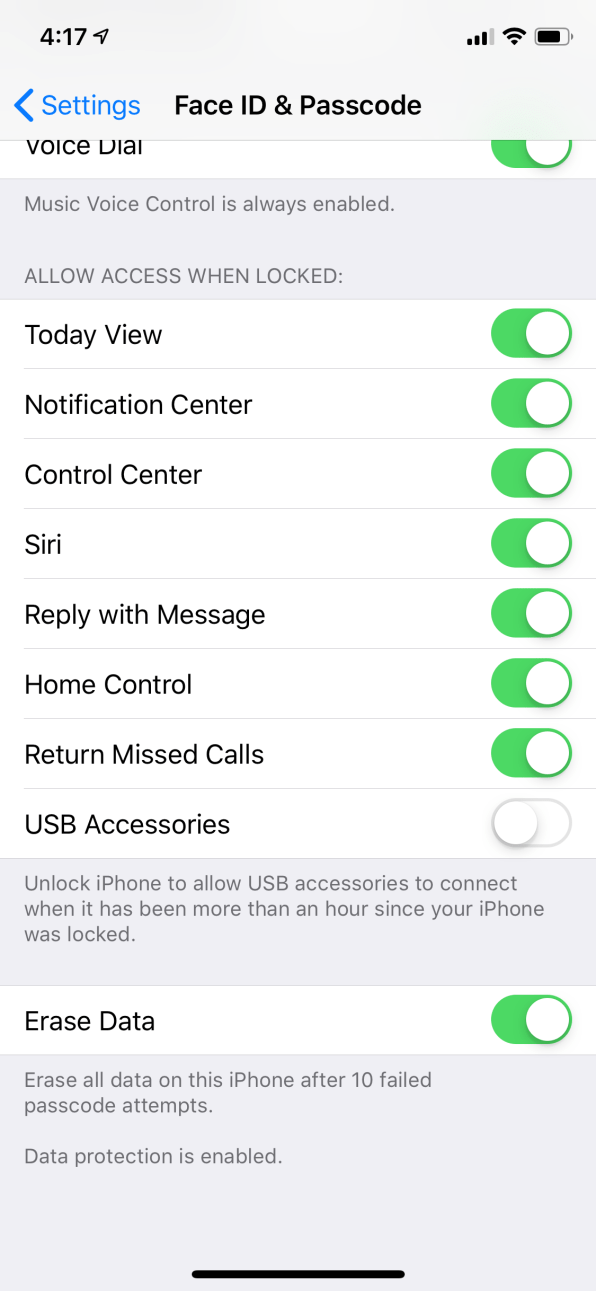
What it is: iOS offers a feature that deletes all data on your iPhone if the wrong passcode is entered 10 times in a row.
Why it's important: The contents of your iPhone contains personal and private details about every aspect of your life. If the worst happens and someone steals it, it's good to know that with this security feature, the thief won't have endless opportunities to guess your passcode. Once they get it wrong for the tenth time, all the data on your iPhone will automatically be deleted and can't be recovered.
Yes, this is a worst-case scenario, but it's better than having all your personal and private data in the hands of a thief or hacker.
How to enable it: Go to Settings>Face ID & Passcode (Touch ID & Passcode on an older iPhone) and at the bottom of the screen, toggle the "Erase Data" switch to on.
[Editor's note: This story was updated and expanded in February 2020.]
How To Secure Your Iphone
Source: https://www.fastcompany.com/90254589/use-these-11-critical-iphone-privacy-and-security-settings-right-now
Posted by: carterponseety.blogspot.com

0 Response to "How To Secure Your Iphone"
Post a Comment